Welcome to the Craft Corner
Advanced: Living Room Crafts
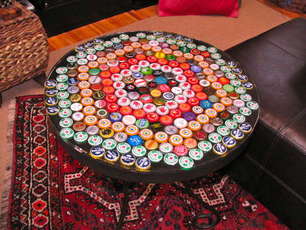
Bottle Cap Table
Tools
As many bottle caps as needed to fill the table
A table (any shape - we recommend a coffee table or side table)
Glue gun and glue sticks or Super glue
Resin Gloss Finish
Painters tape
A table (any shape - we recommend a coffee table or side table)
Glue gun and glue sticks or Super glue
Resin Gloss Finish
Painters tape
Instructions
1. Lay out the bottle caps in the design of your choice
2. Glue down the bottle caps and let it dry over night
3. Once dry, cover the side/edges of the table with painters tape
4. Glaze the finishing gloss over the table and bottle caps to create a sealed and glossy finish, making sure all of the gaps between the caps are covered. Let dry for 24 hours
5. After 24 hours, remove the painters tape.
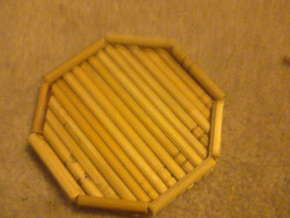
Chopstick Coaster
Tools
Package of chopsticks
Glue gun and glue sticks
Sharp kitchen knife
Sharp Scissors
Cardboard
Glue gun and glue sticks
Sharp kitchen knife
Sharp Scissors
Cardboard
Instructions
1. Cut a few chopsticks in half - these will be for the outline of the coaster
2. Design what shape the coasters will be and make the outline of the shape out of chopsticks
3. Add chopsticks within the frame, cutting each to a length that is necessary to fit within it
4. Glue it down to the frame and to eachother, let it dry
5. Flip the chopsticks over and fill the frame on the other side with more chopsticks to fit within the frame, glue it down and let it dry
6. Cut out a piece of cardboard that is the same shape and size as the coaster. Glue it down to the back of the coaster so that it can rest on a table nicely
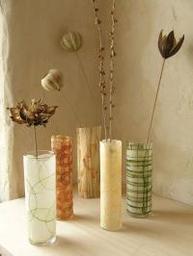
Vintage Vases
Tools
Wrapping paper, shelf liner or decorative paper
Tall empty glass jar or glass cup
Scissors
White craft clue (school glue) or Mod Podge
Tall empty glass jar or glass cup
Scissors
White craft clue (school glue) or Mod Podge
Instructions
1. Measure and cut the paper to the right height of the glass with scissors. You can leave the top edge irregular or cut it straight.
2. Thoroughly paint the back of the paper (the side that will be touching the glass) with white glue or Mod Podge
3. Smooth the paper around the glass vase. Press firmly as you go to remove air bubbles. Let dry before using
4. Once dry, cover the front of the vase with glue or mod podge to set in place and create a glossy finish
